Battery switch on travel trailer function is crucial for managing your RV’s power. Understanding how these switches work – whether single-pole, double-pole, or disconnect – is key to preventing dead batteries and electrical problems. This guide will walk you through different switch types, safe operation procedures, troubleshooting tips, and even how to choose the right switch for your setup.
We’ll cover everything from basic operation to advanced power management system interactions, ensuring you’re confident in handling your travel trailer’s electrical system.
We’ll explore the vital role the battery switch plays in connecting and disconnecting your house battery from the vehicle battery, preventing unwanted power drain when your trailer’s not in use. Learn how to identify and fix common issues like corroded connections and faulty switches, keeping your RV running smoothly on the road and at the campsite.
Battery Switch Types in Travel Trailers
Choosing the right battery switch for your travel trailer is crucial for managing power and protecting your electrical system. Understanding the different types available will help you make an informed decision based on your specific needs and setup. This section will detail the common types, their inner workings, and their respective pros and cons.
Single-Pole Battery Switches
A single-pole battery switch is the simplest type. It controls the power flow from a single battery source (usually your house battery) to the trailer’s electrical system. Imagine a light switch in your house; it’s essentially the same principle, but for your trailer’s battery. Internally, it’s a simple on/off mechanism, often using a lever or rotary switch to connect or disconnect the battery.
The switch itself acts as a single break in the circuit. If you only have one battery powering your trailer, this type might suffice.
Double-Pole Battery Switches
Double-pole switches offer more control, allowing you to isolate two separate battery banks (like your house battery and your vehicle’s starting battery). This is beneficial for preventing accidental draining of your vehicle’s battery. Internally, a double-pole switch has two separate switching mechanisms working in tandem. Each mechanism controls a separate circuit, enabling independent control over each battery.
This allows you to disconnect both batteries completely or individually, or connect either to the trailer’s system.
Disconnect Switches
Disconnect switches, sometimes called battery disconnect switches, primarily serve as a safety measure. They allow you to completely disconnect all power from your trailer’s battery system. This is extremely useful for long-term storage to prevent parasitic drain and damage. These switches often have a simple on/off mechanism, with the internal workings being a single break point in the main power cable.
While not offering the same control as double-pole switches, their simplicity and safety benefits are significant.
Comparison of Battery Switch Types
| Feature | Single-Pole | Double-Pole | Disconnect Switch |
|---|---|---|---|
| Number of Batteries Controlled | One | Two or More | All Batteries Connected to the System |
| Power Control | On/Off for one battery | Independent On/Off for each battery | On/Off for the entire system |
| Advantages | Simple, inexpensive | Improved battery management, prevents cross-drain | Safety, prevents parasitic drain |
| Disadvantages | Limited control, unsuitable for multiple batteries | More complex, slightly more expensive | No individual battery control |
Battery Switch Role in Power Management
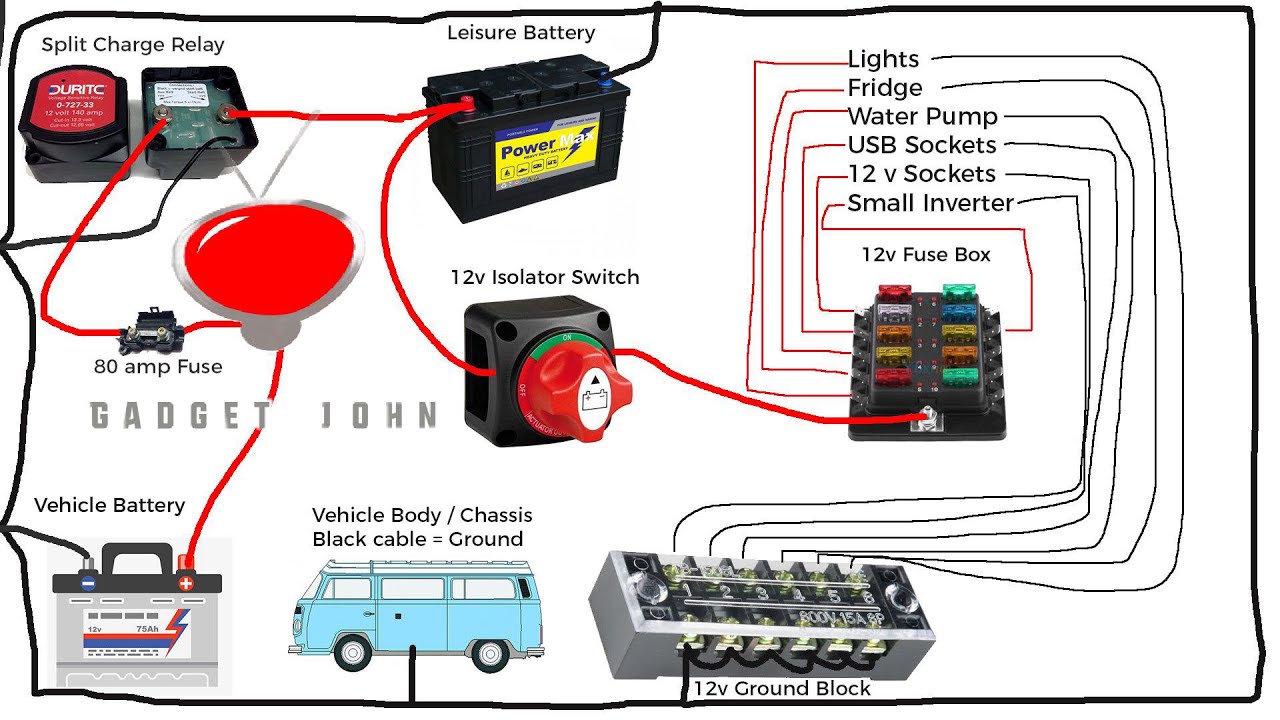
The primary role of a battery switch is to manage the flow of power between the house battery (which powers the appliances in your travel trailer) and the vehicle battery (which starts your tow vehicle). A double-pole switch, for instance, allows you to charge the house battery from the vehicle battery while driving (typically through a charging relay), then disconnect the house battery to prevent draining the vehicle battery when parked.
A disconnect switch allows for complete isolation, protecting your batteries during long periods of inactivity. Choosing the right switch depends on your trailer’s setup and your power management needs.
So, you’re planning a trip? Awesome! First things first: get yourself sorted with travel insurance. Check out Aon travel insurance for some solid options; they’ve got you covered. Then, if you’re an audiophile like me, think about your audiophile travel setup – you don’t want to compromise on sound quality while exploring new places.
Make sure you pack accordingly and enjoy your trip!
Proper Battery Switch Operation
Using your travel trailer’s battery switch correctly is crucial for maintaining your batteries and preventing costly damage. This involves understanding the different switch types and following a safe operational procedure. Improper use can lead to discharged batteries, electrical malfunctions, or even fire hazards.Properly operating your battery switch ensures your trailer’s electrical systems function correctly and prolongs the life of your batteries.
This section Artikels the steps involved in safely switching your house battery on and off, connecting and disconnecting it from the vehicle battery, and the importance of switching it off when your trailer isn’t in use.
Safe Battery Switch Operation Procedure
Before working with any electrical components, always disconnect the negative terminal of your vehicle battery. This prevents accidental shorts and protects you from electrical shock. Then, follow these steps:
- Locate the Battery Switch: Your battery switch is usually located near your batteries, often in a compartment accessible from the outside of your travel trailer.
- Identify Switch Positions: Most switches have clearly marked positions, such as “ON,” “OFF,” and sometimes “Both” or “1-2” to indicate separate control of batteries. Familiarize yourself with the markings before proceeding.
- Turn the Switch ON (if needed): If you’re preparing to use your trailer, carefully turn the switch to the “ON” position. This connects the house battery to the trailer’s electrical system.
- Turn the Switch OFF: When you’re finished using your trailer, always turn the switch to the “OFF” position. This disconnects the house battery and prevents parasitic drain.
Connecting and Disconnecting House and Vehicle Batteries
The method for connecting and disconnecting your house battery from your vehicle battery depends on your switch type. A simple on/off switch only controls the house battery’s connection to the trailer’s electrical system; it doesn’t directly connect or disconnect it from the vehicle battery. More advanced switches might offer this feature.For those with switches allowing this, always consult your trailer’s manual for specific instructions.
Generally, connecting involves turning the switch to a position that bridges the connection between the two battery systems. Disconnecting involves switching to a position that isolates the house battery from the vehicle battery.
Preventing Battery Drain
Leaving your battery switch in the “ON” position when your trailer is not in use will lead to significant battery drain. Even small electronic devices left in the “ON” position, such as a smoke detector or carbon monoxide detector, will eventually drain your battery. This is because these devices draw a small amount of current even when they’re not actively doing anything.
So, you’re planning a trip? Awesome! First things first: get yourself sorted with travel insurance. Check out Aon travel insurance for some solid options; they’ve got you covered for a lot of situations. And speaking of being prepared, if you’re an audiophile, don’t forget your tunes! Make sure you check out this guide on audiophile travel setup to ensure your listening experience on the road is top-notch.
Happy travels!
This can be a problem if you’re leaving your trailer for an extended period.
Always turn off the battery switch when your travel trailer is not in use to prevent unwanted battery drain and extend the life of your batteries.
Troubleshooting Battery Switch Issues: Battery Switch On Travel Trailer Function
Your travel trailer’s battery switch is a critical component, ensuring power flows correctly to your house batteries and preventing accidental drain. Problems with this switch can leave you stranded without lights, appliances, or even the ability to start your tow vehicle if it’s connected. Understanding common issues and troubleshooting steps can save you significant frustration and potential repair costs.Common Battery Switch Problems and Their Causes
Faulty Switches
A malfunctioning battery switch is a primary source of problems. This could be due to internal component failure, wear and tear from repeated use, or damage from exposure to the elements (moisture, extreme temperatures). Symptoms of a bad switch can range from complete lack of power to intermittent power failures, sometimes accompanied by clicking or sparking sounds from the switch itself.
Replacing the switch is usually the solution, ensuring you select a switch with the correct amperage rating for your system.
Corroded Connections, Battery switch on travel trailer function
Corrosion is a common enemy of electrical connections, and battery switches are particularly vulnerable due to their proximity to the batteries. Acid from the batteries can create a build-up of corrosive material on the terminals and switch contacts, leading to poor conductivity or even complete circuit breaks. This often manifests as inconsistent power delivery or a complete lack of power, even if the switch appears to be working.
Visual inspection is key to identifying corrosion; it usually appears as a whitish-green or bluish-green substance on the metal surfaces.
Blown Fuses
While not directly a battery switch problem, blown fuses often manifest as symptoms similar to a faulty switch. Overloads in the electrical system (too many appliances running simultaneously, a short circuit) can cause fuses to blow, interrupting power flow. Checking and replacing blown fuses is a simple troubleshooting step that often solves the problem. Remember to replace fuses with the correct amperage rating; using a higher rating can damage your electrical system.
Troubleshooting Flowchart
A systematic approach is essential for efficient troubleshooting. Here’s a suggested flowchart:
| Step | Action | Result | Next Step |
|---|---|---|---|
| 1 | Visually inspect the battery switch and connections for corrosion or damage. | Corrosion present / Damage present / No issues | Clean connections (if corroded) / Replace switch (if damaged) / Proceed to Step 2 |
| 2 | Check all relevant fuses. | Fuse(s) blown / No blown fuses | Replace blown fuse(s) and retest / Proceed to Step 3 |
| 3 | Test the switch’s functionality using a multimeter. | Switch functions correctly / Switch malfunctions | Problem likely elsewhere in the system / Replace the battery switch |
Cleaning and Maintaining Battery Switch Connections
Regular cleaning and maintenance can significantly extend the lifespan of your battery switch and prevent costly repairs. Before starting any cleaning, always disconnect the negative battery cable to prevent accidental shorts.
- Use a wire brush or sandpaper to remove corrosion from the battery terminals and switch contacts. Be thorough, cleaning all surfaces until they are bright and shiny.
- Apply a dielectric grease to the cleaned terminals and connections. This helps prevent future corrosion and ensures good electrical contact.
- Tighten all connections securely, but avoid over-tightening, which can damage the terminals.
- Periodically inspect the switch and connections for signs of corrosion or damage, ideally before and after each camping season.
Remember, safety is paramount when working with batteries and electrical systems. If you are uncomfortable performing these tasks yourself, consult a qualified RV technician.
Battery Switch and Power Management Systems
Your travel trailer’s battery switch is a crucial component, but its effectiveness depends heavily on the overall power management system. Understanding how these systems interact is key to maximizing your off-grid power capabilities and avoiding electrical issues. Different systems offer varying levels of sophistication and control over your power sources.Power management systems in RVs vary significantly, ranging from simple setups with a basic battery switch and a single power source to complex systems incorporating multiple batteries, solar panels, inverters, and sophisticated charge controllers.
The interaction between these components and the battery switch determines how efficiently your trailer utilizes its power resources. A well-integrated system allows for seamless switching between shore power, generator power, and battery power, while also optimizing charging and preventing overcharging or discharging.
Types of Power Management Systems
Several types of power management systems exist, each offering different levels of complexity and features. Simple systems might only include a battery switch to isolate the house batteries from the rest of the electrical system. More advanced systems incorporate automatic charging relays, battery monitors, and sophisticated control units that manage power flow from various sources. For example, a basic system might just use a simple on/off switch for the house batteries, while a more advanced system could automatically prioritize charging from solar panels before using shore power.
Another example is a system that monitors battery voltage and automatically switches to generator power when the battery level drops below a certain threshold.
Components Interacting with the Battery Switch
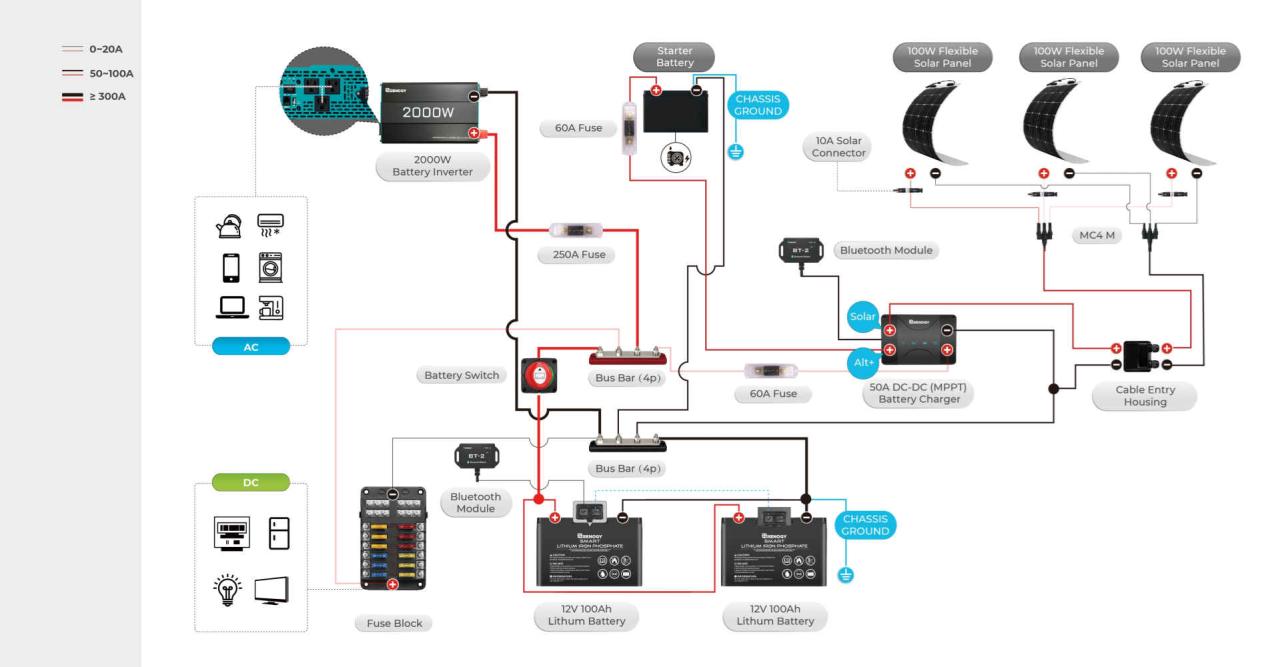
Understanding which components interact with your battery switch is essential for troubleshooting and maintenance. A typical power management system includes several key components that directly or indirectly depend on the battery switch’s position.
- House Batteries: These are the main power source for your RV’s appliances when not connected to shore power. The battery switch directly controls the connection of these batteries to the rest of the electrical system.
- Charging System (Converter/Charger): This component converts AC power (from shore power or a generator) to DC power to charge the house batteries. The battery switch ensures the charger only charges the batteries when the switch is in the “on” position.
- Solar Charge Controller: If your RV has solar panels, this component regulates the charging of the batteries from the solar panels. The battery switch isolates the solar controller from the house batteries when turned off, preventing overcharging or unintended power flow.
- Inverter: This device converts DC power from the batteries to AC power to run appliances that require AC power. The battery switch controls the power supply to the inverter, preventing it from drawing power from the batteries when the switch is off.
- Battery Monitor: This displays the state of charge of your batteries, providing crucial information for managing your power resources. While not directly controlled by the battery switch, its readings are directly affected by the switch’s position.
Interaction with Solar Panels, Inverters, and Other Power Sources
The battery switch acts as a master control for many power sources in your RV. When the switch is “on,” it allows power to flow from the house batteries to various components like the inverter and the lights. When it’s “off,” it isolates the batteries, protecting them from accidental discharge. Solar panels, connected through a charge controller, will continue to charge the batteries even when the battery switch is off in most systems, unless the solar charge controller is also wired through the switch.
Inverters only function when the battery switch is on, providing AC power to your appliances. Shore power or generator power, typically routed through a converter/charger, will charge the batteries only when the battery switch is on, allowing the charging system to function properly.
Mastering your travel trailer’s battery switch is a simple yet powerful step towards ensuring reliable power and preventing costly repairs. By understanding the different types of switches, their operation, and common troubleshooting techniques, you’ll be well-equipped to handle any electrical situation. Remember, regular maintenance and safe operating practices are key to enjoying worry-free adventures. So, grab your multimeter, and let’s keep those batteries charged!
Q&A
What happens if I leave my battery switch on?
Leaving your battery switch on can drain your house batteries, especially if you have devices drawing power even when the trailer isn’t in use. This can lead to a dead battery and the need for a jump start.
How often should I clean my battery switch connections?
Inspect and clean your battery switch connections at least once a year, or more often if you notice corrosion. Regular cleaning prevents poor connections and potential electrical issues.
Can I use any type of battery switch in my travel trailer?
No, the appropriate battery switch depends on your battery bank’s amperage. Choose a switch with a higher amperage rating than your battery bank’s capacity to avoid overloading the switch.
My battery switch is making a clicking noise. What’s wrong?
A clicking noise often indicates a problem with the switch itself or a loose connection. Inspect the connections and consider replacing the switch if the problem persists.
